Most IT organizations have strict naming conventions for their hosts (servers, network devices and others) representing valuable information about:
- country
- region
- customer
- application
- server
- client
- network
- environment (test/production)
- …
This list might be longer or any kind of subset of these attributes. As a sample I use my devices available in my home environment. (A review of my naming convention seems to be very urgent…)
Often naming conventions offer the ability to understand the usage of a given device, the location, or whatever. This information is also required to make your monitoring journey a success.
checkmk offers two key features to attach information of this kind to discovered hosts, labels and tags. In my opinion, the most valuable advantage of labels, compared to tags, is the ability to assign labels dynamically, without any dependency to folders or other mechanism.
This qualifies labels to dynamically apply “attributes” to hosts, using the currently valid naming conventions.
My home naming conventions are:

The following things I’d like to identify for monitoring:
- the owner of the system
- the type of the system (virtual system or physical)
- the application, which is hosted on the system
- the classification of the physical systems (e.g.: always online or not)
To do so, follow these steps in checkmk:
First Step: Open the setup dialog

- Type “host labels” in the search area
- In the navigation bar click “Setup”
- Click on host labels to enter the rules area for labels
Second Step: Use the “Create rule in folder” button
As naming conventions should apply across all systems in my monitoring environment, I create these rules in the “Main directory”.

Fill in your settings

- A description of your Rule
- The label you want to attach to this set of devices (how labels work)
- Select explicit hosts, to write down a regular expression, selecting the focused host names. The “~” indicates, that a regular expression will follow.
- Don’t forget to save your changes.
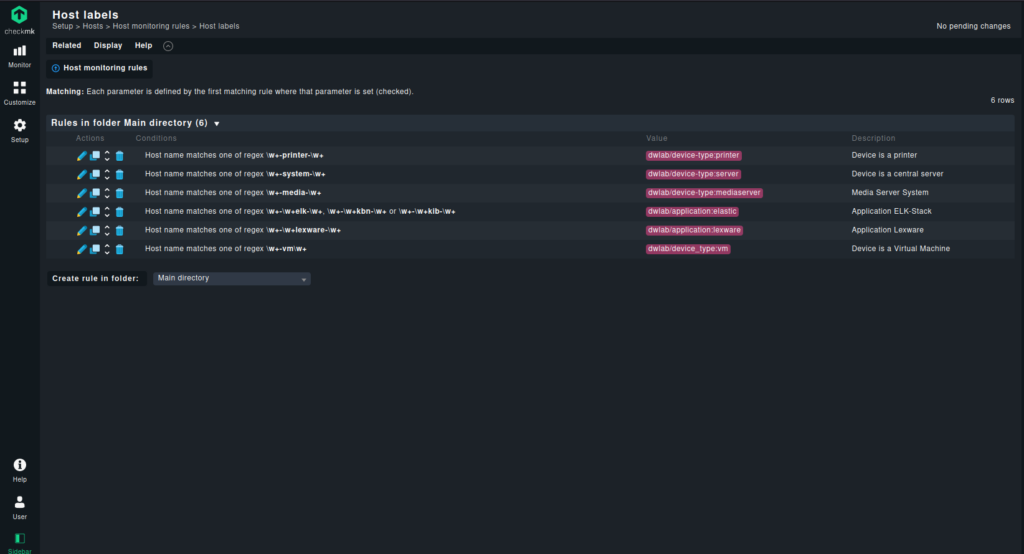
After repeating the above steps for all of my weak naming convention entries, I have the following rule set.

Please note, that my label names follow some conventions, to make sure, that there is no chaos introduced in the setup of checkmk.
Summary:
Labels can be implied dynamically to the hosts in your checkmk monitoring environment. Tags can’t be applied in this way. Labels can be used later on, while defining monitoring rules, views, dashboard, filters and so on. Labels are a good mechanism to group hosts in different dimensions.


